

Last Updated: October 25, 2026
Quick Summary
To prevent model train derailments, check wheels first for out-of-gauge spacing, keep track clean to maintain traction, and inspect turnouts to ensure blades sit flush against stock rails. Most derailments stem from one of these three causes: wheel problems, track issues, or turnout failures.
- Out-of-gauge wheels catch on rails or flange guards; use an NMRA go/no-go gauge tool to check back-to-back spacing, flange depth, and wheel tread on every axle.
- Dirty track reduces electrical contact and mechanical grip, causing locomotives to slide sideways on curves; wipe rails weekly with a dry cloth and use a track cleaning block for oxidation.
- Turnout blade fit is the most common turnout problem; the blade must rest completely flat against the stock rail with no visible gap underneath.
- Derailments at the same spot point to track or turnout issues, while random derailments suggest wheel gauge or dirty track problems.
- Follow a monthly maintenance schedule including track inspection, wheel gauge checks, turnout blade inspection, and full layout test runs to catch problems early.
Table of Contents
- Understanding Why Model Trains Derail
- Checking and Correcting Model Train Wheel Gauge
- Cleaning Model Train Tracks Effectively
- Inspecting and Adjusting Track Alignment and Level
- Diagnosing and Fixing Model Train Turnout Derailments
- Preventive Maintenance Schedule and Troubleshooting Flowchart
- Getting Help with Your Layout Setup at BYMRR
- Frequently Asked Questions
Understanding Why Model Trains Derail
To prevent model train derailments, you must understand their clear causes, which usually fall into three categories: wheel problems, track issues, or turnout failures.
Check wheels first: out-of-gauge wheels catch on the rail or flange guard and tip the car off.
At BYMRR, we’ve helped hobbyists solve recurring derailments by starting with diagnosis, jumping straight to fixes wastes time and money.
Derailments in the same spot every time point to track or turnout problems. Random derailments suggest wheel gauge issues or dirty track.
Checking and Correcting Model Train Wheel Gauge
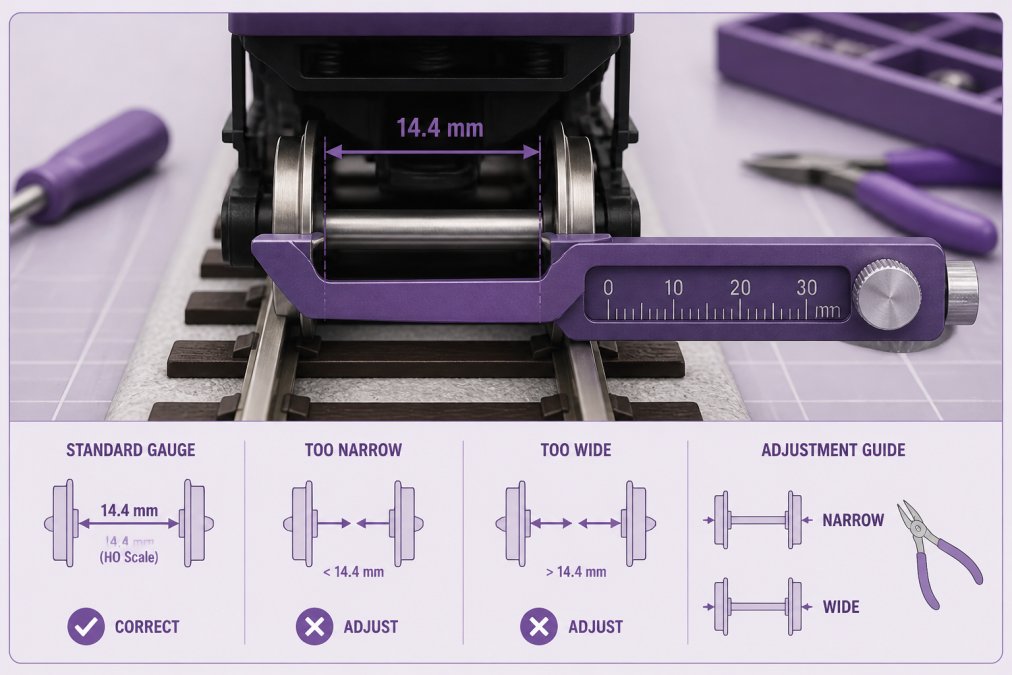
Wheel gauge is the distance between the inside edges of a pair of wheels on an axle. The National Model Railroad Association (NMRA) publishes standards for each scale covering more than one dimension, so measure the right feature with the right tool (S-4.2 Wheels, Standard Scale).
The measurements that actually matter
Most derailments blamed on “wheel gauge” are really one of three separate problems:
- Back-to-back spacing, the distance between the inside faces of the two flanges. This is the dimension that decides whether a wheelset fits through a turnout’s guard rails and frog. If back-to-back is too wide, the flange climbs the guard rail; if it is too narrow, the wheelset drops into the frog gap.
- Flange depth and thickness, a flange that is too deep bottoms out on the rail head or strikes joint bars and frog castings. A flange that is too thin lets the wheelset wander laterally.
- Wheel tread width and profile, a worn or tapered tread changes where the wheel contacts the rail and can make a car hunt from side to side at speed.
A single “gauge” number does not capture all three, which is why a go/no-go gauge tool beats a caliper: it checks the wheelset against the standard profile in one pass.
Scale-specific reference points
Use these as starting checks, then confirm against the current NMRA standard for your scale, because published dimensions are revised over time:
| Scale | Typical back-to-back reference | Common gauge tool |
|---|---|---|
| Z | Approximately 6.5 mm | NMRA Z gauge |
| N | Approximately 9.0 mm | NMRA N gauge |
| HO | Approximately 16.5 mm | NMRA HO gauge |
| S | Check current NMRA standard | NMRA S gauge |
| O | Check current NMRA standard | NMRA O gauge |
Do not treat the numbers above as universal. Track standards differ between NMRA and other published systems, and some imported rolling stock is built to a different standard than the track you are running it on. Always confirm the current published dimension for your specific scale and standard before filing or replacing anything.
How to check a wheelset properly
- Remove the wheelset or car from the layout. The rails hold wheels in position and hide problems.
- Seat the wheelset in the gauge tool. Flanges should drop into the slots and treads should sit flat against the reference surfaces.
- Check back-to-back first. If the wheelset will not seat, note whether spacing is too wide or too narrow before adjusting.
- Check flange depth. Roll the wheelset along the gauge; a flange that bottoms out or rides up is too deep.
- Check for wobble. Spin the wheelset on a flat surface; a wheel not perpendicular to the axle causes rhythmic derailments at a fixed distance.
- Repeat on every axle. One bad wheelset in a truck is enough to derail a car.
Check the wheelsets on a new car before its first run. Manufacturing variance and shipping damage are common, and catching a bad wheelset before it derails saves the couplers, paint, and detail parts that break in a fall.
Correcting an out-of-gauge wheelset
Out-of-gauge wheels come from worn wheels, manufacturing defects, and damage from previous derailments or rough handling.
If back-to-back spacing is slightly off: Some press-fit wheelsets can be adjusted by twisting the wheel on the axle with a proper wheel press or gauge tool.
If the flange is too deep or the tread is worn: Filing a flange is a last resort, it removes material that cannot be replaced, and an over-filed flange will not guide the wheelset through turnouts.
If the wheelset is badly out of spec or damaged: Replace it.
Test before you run a full session
After correcting or replacing wheelsets, test them deliberately:
- Roll the car by hand through your tightest curve in both directions.
- Push it through every turnout, facing-point and trailing-point.
- Run it at low speed and listen for clicking or rhythmic bumping.
If the car still derails in the same place, the problem is more likely track geometry or a turnout defect than the wheelset.
Cleaning Model Train Tracks Effectively
Dirty track is the second most common cause of model train derailments. Dust, oxidation, and debris reduce electrical contact and mechanical grip.
Track cleaning matters most on curves and turnouts, which see the most stress. Clean track first, then diagnose other issues.
Preventive cleaning is best: wipe track with a dry cloth weekly if you run trains regularly, removing loose dust before it builds up.
Here’s the step-by-step process:
- Stop all trains and unplug the power supply
- Inspect the track visually for heavy dirt or corrosion
- Wipe the top of the rails with a dry cloth
- For oxidized rails, use a track cleaning block or cleaner
- Wipe away residue with a dry cloth and let any cleaner dry completely
- Test with a locomotive before running a full session
Watch out: some track cleaners leave a residue that builds up over time. If derailments continue after cleaning, the problem is likely wheel gauge or a turnout issue, not dirty track. Learn how to fix model train derailments with step-by-step troubleshooting when prevention methods haven’t resolved the issue.
Inspecting and Adjusting Track Alignment and Level
Track alignment and level directly affect how rolling stock handles curves and switches. Even small misalignments cause derailments on tight curves or at speed.
Check level with a small spirit level on the rail. If one rail is higher, shim the foam or cork roadbed underneath with thin cardboard or plastic.
Common alignment problems include:
- Rails that have shifted or spread apart
- Track connections that aren’t tight or flush
- Roadbed that has settled or warped
Fixing alignment usually means removing that section of track and reinstalling it correctly; adjustable track clamps are only a temporary fix.
Diagnosing and Fixing Model Train Turnout Derailments
Turnouts cause more derailments than any other single component. The most common problem is blade fit: the blade should rest completely flat against the stock rail with no gap.
Blade fit issues come from:
- Bent or warped blades from impact or age
- Worn pivot points that let the blade sit too high
- Debris trapped between blade and stock rail
Start by cleaning the blade and stock rail thoroughly, sometimes this alone fixes it.
The frog, where the rails cross, is another critical component.
Test your turnout repair by running a locomotive through slowly in both directions. The train should switch smoothly with no binding or hesitation.
Preventive Maintenance Schedule and Troubleshooting Flowchart
Prevent most derailments with a routine, and diagnose the ones that still happen with a symptom-based workflow. The schedule below turns general advice into a repeatable habit; the diagnostic sequence helps you isolate whether the cause is the locomotive, a specific car, track geometry, or a turnout.
Preventive maintenance schedule
Adjust frequencies to how often you run trains. The times assume a modest layout and a weekly operating session.
| Task | Frequency | Time Required | What to Look For |
|---|---|---|---|
| Visual track inspection | Weekly | 5 minutes | Debris, loose joiners, kinked curves, shiny wear spots |
| Track cleaning | Before each session, plus a weekly deep clean | 10-15 minutes | Oxidation, residue, dust on rail heads |
| Wheel gauge check on cars in rotation | Monthly | 15 minutes | Wheelsets that will not seat in the gauge |
| Turnout blade and frog inspection | Monthly | 10 minutes | Gaps under blades, worn frog points, debris |
| Locomotive wheel and pickup inspection | Quarterly | 10 minutes | Dirty treads, lint on pickups, loose bogies |
| Coupler height and trip pin check | Quarterly | 10 minutes | Couplers below or above the gauge, drooping trip pins |
| Full layout test run at low and normal speed | Monthly | 30 minutes | Any repeat derailment location |
Keep a simple log of derailments: date, location, train, direction of travel, and speed. After a few weeks, patterns emerge that are invisible in the moment, a car that derails only when trailing, a curve that fails only at speed, a turnout that fails only when set to the diverging route.
Symptom-based troubleshooting workflow
Work through these questions in order.
1. Does the derailment happen at the same spot every time?
If yes, the cause is almost always in the track or a turnout there.
**2.
If yes, the problem is that rolling stock.
3. Does it happen only on curves?
4. Does it happen only at turnouts?
5. Does it happen only at speed, or only when accelerating or braking?
6. Does it happen randomly across the whole layout?
7. Does the locomotive itself derail without any cars attached?
This isolates the problem to the locomotive.
The fastest path to a fix is to reproduce the derailment deliberately: same train, same direction, same speed, same location. A derailment you can reproduce is a derailment you can diagnose.
After you make a repair
Test the repair in the same conditions that produced the derailment. Run the same train, in the same direction, at the same speed, through the same location. Then run it in the opposite direction and at a slower speed to confirm the fix holds under different loads. If the derailment moves to a new location, you have fixed one cause and revealed another, go back to step 1.
Getting Help with Your Layout Setup at BYMRR
Derailment problems can be frustrating, especially after multiple failed fixes.
If you’re struggling with persistent derailments, our comprehensive model railroading guides provide detailed step-by-step instructions for track cleaning and maintenance.
New to model railroading and unsure where to start? Our beginner’s guide to model railroading covers foundational concepts like layout planning and scale selection before you tackle maintenance issues.
The NMRA publishes standards for wheel gauge, track specifications, and turnout design.
According to the National Model Railroad Association standards, proper wheel gauge is the single most important factor in preventing derailments.
Many hobbyists find that monthly maintenance plus immediate diagnosis when problems occur keeps layouts running smoothly.
Frequently Asked Questions
Why does my model train keep derailing on the same spot?
Recurring derailments in one location usually point to track problems at that exact spot. Check for misalignment, debris, or a gap in the rail connection. Inspect the turnout blade fit if it’s near a switch. Clean the track thoroughly and test wheel gauge on rolling stock that derails. If the problem persists, measure the track geometry with a straightedge to spot high or low spots that throw wheels out of gauge.
Can dirty model train tracks cause derailments?
Yes. Dust, oil, and oxidation on rails reduce wheel contact and electrical conductivity, causing wheels to lose grip and slip sideways. Dirty track is one of the most common causes of derailment. Clean your layout regularly with a track cleaner or a soft brush and isopropyl alcohol. Pay special attention to turnouts, curves, and areas where locomotives sit idle.
How do I know if my model train wheels are out of gauge?
Out-of-gauge wheels are too wide or too narrow for your track standard. Use a wheel gauge tool (available for HO, N, and other scales) to measure the distance between wheel flanges. Compare the reading to NMRA standards for your scale. Wheels that exceed the maximum gauge will catch on rail edges and derail, especially on curves and turnouts. Replace or adjust any rolling stock that fails the gauge test.
How fast should a model train go through a turnout?
Run locomotives and rolling stock through turnouts at a slow, steady speed, typically one-third to one-half of normal operating speed. High-speed passage causes wheels to climb the frog or blade due to momentum. Slow operation allows wheels to follow the turnout geometry smoothly. If your train still derails at turnouts even at slow speed, the issue is usually blade sharpness, frog angle, or guard rail clearance, not speed alone.
Derailment problems don’t have to derail your hobby. Start with diagnosis: check your wheel gauge, clean your track, and inspect your turnouts. Most derailments solve themselves once you identify the actual cause. BYMRR has helped thousands of model railroaders solve these issues with our detailed guides and quality products. Get started with our comprehensive maintenance guides and keep your layout running smoothly for years to come.
