

Table of Contents
- Understanding Model Train Scales Explained
- Planning Your First Model Railroad Layout
- Beginner Model Train Layout Ideas
- Essential Model Railroad Tools for Beginners
- Real Cost to Start Model Railroading
- Your First Week: Step-by-Step Setup
- Common Beginner Mistakes and How to Avoid Them
- Frequently Asked Questions
Last Updated: October 19, 2026
Understanding Model Train Scales Explained
Model train scales represent the proportional size relationship between your miniature trains and real locomotives.
Scale refers to the ratio between model and prototype. An HO scale model, for example, is 1:87, meaning one unit on the model represents 87 units on a real train. Gauge, by contrast, describes the distance between the rails themselves, measured in millimeters or inches.
Common scales for beginners
HO scale dominates the beginner market. It’s large enough to see fine details, small enough to fit in modest spaces, and offers the widest selection of affordable locomotives and rolling stock.
O scale (1:48) and G scale (1:22.5) are larger and more expensive, typically chosen by collectors or those building elaborate outdoor layouts. For your first layout, HO or N scale offers the best balance of affordability, detail, and practicality.
Scale vs. gauge: what’s the difference
Gauge is purely mechanical: it’s the track width. HO uses 16.5mm gauge, N uses 9mm, Z uses 6.5mm. Scale is the visual proportion. You could theoretically have an HO-scale engine on N-gauge track (called “HOn3”), but this creates compatibility headaches that beginners should avoid.
The takeaway: pick a scale first, then buy track and locomotives in the matching standard gauge. Don’t mix scales on the same layout, your trains will look disproportionate.
Planning Your First Model Railroad Layout
Before you buy a single piece of track, measure your available space honestly. A 4×8-foot layout is the classic starter size, it fits in a basement corner, spare room, or garage and offers enough room for scenery and interesting track configurations. If you have less space, a 3×6-foot layout or even a 2×4-foot micro layout works fine.
Measuring your available space
Grab a tape measure and check the dimensions of your intended location. Account for access: you’ll need to reach the center of your layout comfortably.
Consider height too. A layout at waist level (36-42 inches) is more enjoyable than one on the floor. If you’re building on a table, standard height is around 40 inches. This also protects your back during long operating sessions.
Starting with a starter set or building separately
A starter set includes a locomotive, several cars, a loop of track, a controller, and a power supply, everything you need to run trains immediately. For beginners, this removes guesswork and typically costs less than buying components separately.
Building separately gives you complete control over your consist (locomotive and car combination) and layout design. You buy track pieces, a controller, a power supply, and locomotives individually. This approach costs more upfront but offers flexibility.
Beginner Model Train Layout Ideas
Your layout doesn’t need to be complex to be satisfying. Simple configurations teach you how track, electricity, and locomotives work together.
Micro layouts for small spaces
A micro layout fits on a shelf, desk, or small table, typically 2×3 feet or smaller. You can create a complete scene: a small town, a rural station, or a single-track branch line. The advantage is low cost and quick setup.
Micro layouts work well for testing new locomotives before integrating them into a larger system. They’re also ideal for apartment dwellers or anyone with space constraints.
The classic 4×8-foot layout
The 4×8-foot layout is the industry standard for good reason. It’s large enough for interesting track work, you can include a main line, sidings, and a small yard, yet compact enough to fit most spaces.
A basic 4×8 track plan includes an outer loop for main-line running and inner sidings for switching cars. This teaches you practical skills: you can operate the layout realistically, not just run trains in circles.
Essential Model Railroad Tools for Beginners
You don’t need an elaborate tool collection to start. A few basics will carry you through your first months of model railroading.
Track, controller, and power supply basics
Track comes in two main varieties: DC (direct current) and DCC (digital command control).
Your controller regulates power to the track. A basic DC controller costs less than a premium DCC system.
Wiring connects your power supply to the track. Use rail joiners (metal clips that connect rail ends) or solder connections directly. Soldered connections are more reliable, but rail joiners work fine initially.
Hand tools and maintenance supplies
A hobby knife with fresh blades handles plastic parts cleanly. A small screwdriver set (flathead and Phillips) assembles locomotives and cars. A digital multimeter tests electrical connections, invaluable for troubleshooting derailments caused by broken circuits.
Keep a brush or cloth for track cleaning. Dirty track is the leading cause of electrical problems. A track cleaning block (a specialized eraser) removes oxidation. Lubricating oil for locomotive wheels and gears keeps everything running smoothly and extends equipment life.
Real Cost to Start Model Railroading
Budget honestly before you buy. Model railroading doesn’t require unlimited spending, but understanding where costs concentrate prevents surprises.
Breaking down your first-year budget
A starter set (locomotive, cars, track, controller, power supply) represents your largest initial expense. Quality varies widely, so research specific sets before purchasing.
Locomotives are the premium items. A quality HO-scale locomotive costs more than an entire starter set, but you don’t need multiple locomotives immediately. Start with one good engine and add others as your skills and interests grow.
BYMRR helps beginners navigate these decisions with curated starter sets and component packages.
Where to find value as a beginner
Starter sets offer better value than buying components individually when you’re learning.
Used equipment from model rail clubs, online forums, and hobby shops can reduce costs significantly. Experienced hobbyists often upgrade and sell perfectly functional locomotives and cars. Join a local model railroad club to access both used equipment and expert advice.
| Budget Level | Initial Investment Range | What’s Included | Best For |
|---|---|---|---|
| Starter | $80-$150 | Locomotive, cars, basic track loop, controller, power supply | First-time hobbyists learning basics |
| Intermediate | $200-$400 | Quality starter set plus additional track, basic scenery supplies, maintenance tools | Building a micro or small layout |
| Enthusiast | $500-$1,000+ | Multiple locomotives, extensive track, detailed scenery, DCC system, specialized tools | Serious hobbyists planning larger layouts |
Your First Week: Step-by-Step Setup
Your first week of model railroading focuses on assembly, testing, and troubleshooting. This hands-on approach teaches you how everything works together.
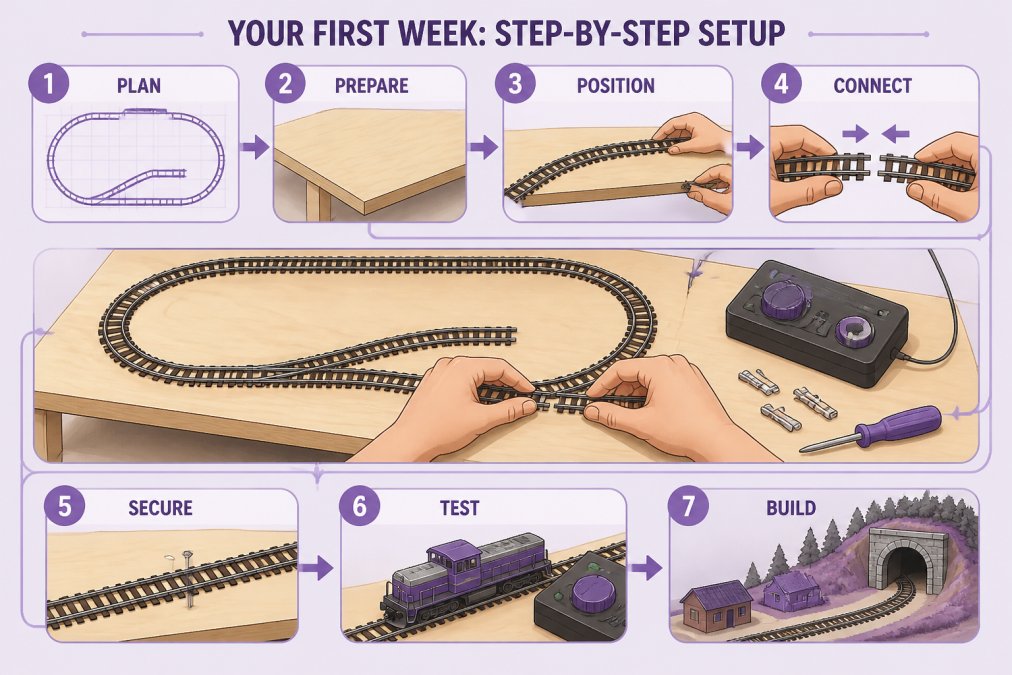
Days 1-2: Assemble your track and power system
Start by assembling your track layout. If you’re using a starter set, lay out the track pieces according to the instructions, typically a simple loop.
Connect your power supply to the controller, then connect the controller to the track using the provided wires. Most starter sets include color-coded wires: red for positive, black for negative.
Days 3-4: Test your locomotives and rolling stock
Place your locomotive on the track gently. Turn the controller to low speed and gradually increase throttle. The engine should move smoothly.
Add one car at a time to your locomotive. Each car should couple smoothly and pull without resistance. Listen for grinding sounds, they indicate misaligned wheels or couplers.
Run your train for 15-20 minutes at moderate speed. This is a break-in period. Locomotives run better after initial operation as internal friction decreases.
Days 5-7: Troubleshoot derailments and wiring issues
Derailments are normal during setup. The most common cause is dirty track. Clean every rail section thoroughly with a track cleaning block, then test again.
Check all rail joiners for tightness. Loose joiners break electrical continuity, causing the locomotive to lose power mid-track. If a derailment happens at the same spot repeatedly, inspect that section closely.
Test electrical continuity with your multimeter. Touch the probes to the two rails at different points. You should read 12 volts everywhere.
Common Beginner Mistakes and How to Avoid Them
Most problems beginners encounter are avoidable with awareness.
Oversizing your layout too quickly
The temptation is strong: you see beautiful large layouts and want to replicate them immediately. Resist. A 4×8-foot layout takes weeks to complete properly, and a 2×4-foot layout teaches you everything you need to know in less space and time.
Build small, finish it, and then expand. A completed micro layout is more rewarding than an unfinished 4×8. You’ll learn faster, stay motivated, and avoid the common trap of abandoning a half-built large layout.
Ignoring track quality and electrical connections
Cheap track looks fine but causes chronic derailments and electrical failures. Invest in quality track from established manufacturers, the difference in price is modest, and reliability is dramatically better. Clean track regularly: a five-minute weekly cleaning prevents most electrical problems.
Solder connections whenever possible instead of relying on rail joiners alone. Soldered joints don’t loosen over time and provide superior electrical contact. If soldering intimidates you, use quality rail joiners and check them monthly.
Skipping the model rail club experience
Local model railroad clubs offer three irreplaceable benefits: hands-on mentorship, access to used equipment, and community.
Many clubs offer member discounts at hobby shops and online retailers. NMRA membership (National Model Railroad Association) connects you to clubs nationwide and provides technical resources specific to your scale and interests.
Starting model railroading requires patience, basic tools, and realistic expectations about space and budget.
At BYMRR, we guide beginners through this exact process. Whether you’re building a micro layout or planning a 4×8-foot masterpiece, we provide the locomotives, track, tools, and knowledge to help you succeed. NMRA official resources offer technical standards and club directories to connect you with experienced hobbyists in your area.
Frequently Asked Questions
What scale should a beginner choose for model railroading?
HO scale (1:87) and N scale (1:160) are the most beginner-friendly options. HO scale offers larger, easier-to-handle models and more widely available track and locomotives. N scale requires less space but demands steadier hands for assembly. Your choice depends on available space and budget. Visit BYMRR’s website to explore starter sets in both scales and find which fits your needs.
How much space do you need to start a model railroad?
You can start with as little as 2 feet by 3 feet for a micro layout. The classic beginner layout is 4 feet by 8 feet, which fits most basements or spare rooms. Measure your available space first, then choose your scale and layout design accordingly. Starting small lets you expand later without rebuilding everything from scratch.
Should beginners start with a train set or buy track and trains separately?
Starter sets are ideal for beginners because they include everything you need: track, a ready-to-run locomotive, rolling stock, a controller, and a power supply. They’re cost-effective and eliminate guesswork. Once you understand how your layout works, you can add individual locomotives and cars to expand your railroad. BYMRR offers curated starter sets designed specifically for beginners.
What tools and supplies do you need to build a model railroad?
Essential tools include track cutters, a hobby knife, a small screwdriver set, tweezers, and a soldering iron for electrical connections. You’ll also need track cleaner, lubricant for locomotives, and a multimeter to test electrical circuits. Hand tools for scenery work like a foam cutter and paint brushes come later. Start with basic tools and add specialized equipment as your skills grow.
Is model railroading an expensive hobby?
Model railroading can range from affordable to expensive depending on your scale, layout size, and detail level. You can start with a quality starter set and basic layout for a modest investment. Costs increase as you add more locomotives, rolling stock, and scenery details. Many hobbyists find value in starting small and expanding gradually over months or years rather than buying everything at once.
How do you plan a simple model railroad layout?
Start by sketching your available space on paper and deciding your scale and gauge. Plan a simple loop of track as your foundation, then add sidings or a second loop for complexity. Leave room for scenery and access to troubleshoot. Most beginners begin with an oval or figure-eight configuration. Online layout planning tools and model rail club members can offer guidance before you purchase materials.
What should I do if my trains keep derailing?
Derailments usually stem from three causes: dirty track, poor electrical connections, or misaligned track joints. Clean your track with a specialized cleaner and check all electrical connections with a multimeter. Inspect track joints for gaps or misalignment and adjust as needed. Test one locomotive at a time to identify if the problem is with your layout or a specific engine. BYMRR’s support team can help you troubleshoot specific issues.