

Table of Contents
- Why Model Train Tracks Need Cleaning
- Identifying Dirt, Oxidation, and Rust on Your Tracks
- Best Cleaner for Model Train Tracks
- Model Railroad Track Cleaning Tools and Methods
- How Often to Clean Model Train Tracks
- Cleaning Model Train Track Without Abrasives
- Complete Wheel and Track Maintenance Workflow
- Diagnosing and Fixing Recurring Stalls After Cleaning
- Step 1: Verify Your Track Cleaning Was Complete
- Step 2: Inspect and Clean Locomotive Wheels
- Step 3: Check for Power Supply and Wiring Issues
- Step 4: Examine Rail Joints and Continuity
- Step 5: Inspect Locomotive Pickups and Wheels for Damage
- Step 6: Evaluate Your Layout Environment
- Troubleshooting Flowchart
- Keep a Maintenance Log
- Frequently Asked Questions
Last Updated: October 11, 2026
Why Model Train Tracks Need Cleaning
Dirty tracks kill your layout’s performance. Locomotives stall unexpectedly. Rolling stock derails for no reason. The problem isn’t your wiring or your engines, it’s the connection between wheels and rails.
Model train tracks accumulate dirt, grime, dust, and oxidation over time, blocking electrical contact between wheels and rails. Any buildup creates resistance, causing voltage drop and stalls across all gauges.
Cleaning model train tracks requires the right approach. Invest 30 minutes monthly and your layout runs smoothly.
Identifying Dirt, Oxidation, and Rust on Your Tracks
Dirt and grime look obvious, dust, lint, and debris on the rails, and a simple cloth wipe removes most of it. Oxidation appears as dull gray or dark discoloration and blocks conductivity. Rust shows up as reddish-brown spots; it’s more serious, forms faster in humid environments, and requires aggressive cleaning.
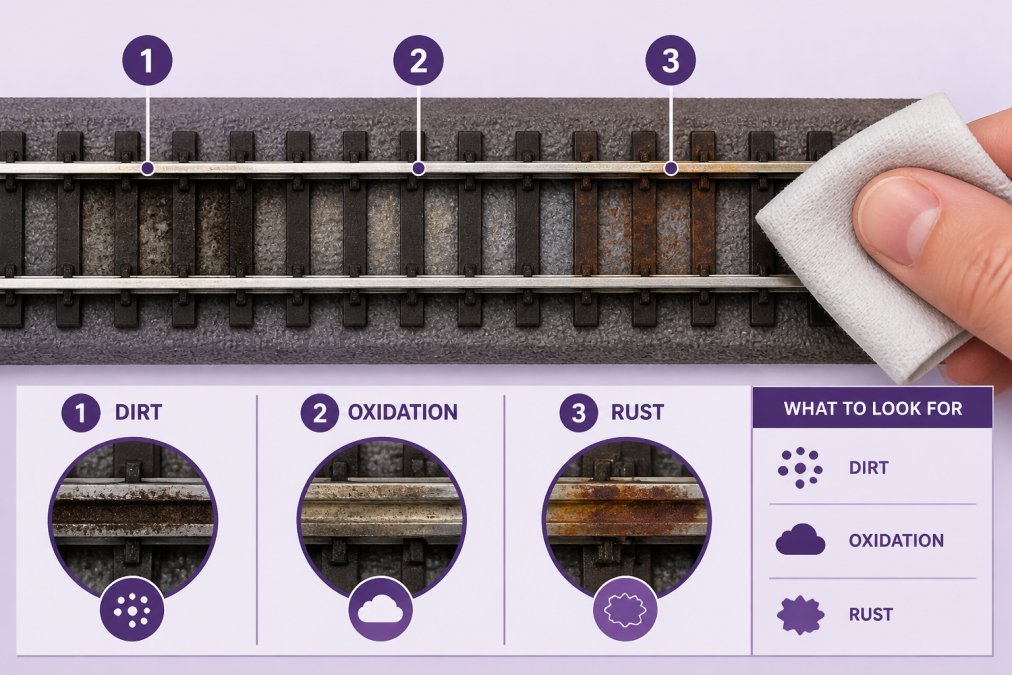
Run your finger along the rails; if they feel rough or sticky, contamination is present.
Best Cleaner for Model Train Tracks
The cleaner you choose matters. Using the wrong solvent can damage plastic ties, scenery, paint, and electrical pickups.
Alcohol-Based Cleaners
Denatured alcohol is the gold standard for cleaning model train tracks. It evaporates quickly (within 5 minutes), leaves no residue, and removes grime and light oxidation effectively. Always use it on a damp cloth, not soaked, and wipe immediately. Allow full evaporation before running trains. Use a white cloth so you can see what you’re removing.
Rubbing alcohol (isopropyl alcohol) evaporates slower (10-15 minutes) but is cheaper and easier to find. Use the same precautions: damp cloth only, immediate wiping, and full evaporation before operation.
Household Alternatives
Vinegar (white vinegar) is safe for delicate scenery but requires more effort and evaporates slowly. Dampen a cloth, wipe tracks, and follow with a dry cloth.
Water alone removes dust but won’t address oxidation and dries slowly. Avoid it on layouts with metal rail joiners or steel rail.
Fluids to Avoid
Salt is too abrasive and corrodes metal. Acetone and lacquer thinner dissolve plastic ties, scenery, and paint; never use them. Mineral spirits and paint thinner leave oily residue that attracts dust and softens plastic. Brake cleaner damages plastic and paint.
Choosing Your Cleaner Based on Layout Conditions
If your layout has plastic ties and detailed scenery, use denatured or rubbing alcohol on a damp cloth only, or stick with vinegar for maximum safety. If your layout is all-metal or you’re cleaning just the rails in isolation, denatured alcohol is your best choice for speed and effectiveness. If you have delicate paint or custom scenery, test any solvent on a hidden section first, and consider vinegar as your primary cleaner despite the extra time required.
Model Railroad Track Cleaning Tools and Methods
Your tools determine how much control you have and how quickly the job gets done.
Non-Abrasive Methods
A white cloth (cotton) with alcohol or water is safe and gives complete control, ideal for delicate layouts.
A track-cleaning eraser is a rubber block that removes light oxidation and grime without scratching. Rub it along the rails with moderate pressure.
A Scotch-Brite pad (blue non-abrasive type) removes oxidation without deep scoring. Use light pressure and wipe in the direction of the rails.
Abrasive vs. Non-Abrasive: Understanding the Trade-Offs
Abrasive cleaning (sandpaper, steel wool) removes stubborn rust quickly but creates tiny scratches that collect dirt faster, requiring more frequent cleaning. Non-abrasive methods take longer but preserve the rail surface and keep tracks cleaner longer between cleanings.
Our recommendation: Use non-abrasive methods as your default. Save abrasive approaches for heavy rust that won’t respond to anything else. When you do use abrasives, follow up with alcohol to remove all particles and prevent future rust.
How Often to Clean Model Train Tracks
Cleaning frequency depends on your layout’s conditions. Dust-heavy environments need weekly cleaning. Dry, climate-controlled spaces can go 2-3 weeks between cleanings. High-humidity areas need weekly or twice-weekly attention.
Cleaning Model Train Track Without Abrasives
This is the safest approach for most layouts.
Step 1: Inspect your track for visible dirt, oxidation, or rust. Step 2: Gather materials, white cloth, denatured or rubbing alcohol, and a small container. Step 3: Dampen your cloth (damp, not dripping). Step 4: Wipe each rail along its length multiple times. Step 5: Check progress, the rail should feel smooth and slightly shiny. Step 6: Let it dry (5 minutes). Step 7: Test your layout by running a locomotive. This takes 15-30 minutes depending on layout size.
Complete Wheel and Track Maintenance Workflow
Track cleaning alone isn’t enough. Dirty wheels cause problems too. Step 1: Clean your track first. Use the non-abrasive method above. Step 2: Inspect locomotive wheels. They should be shiny and smooth. If dull or grimy, they need cleaning. Step 3: Clean wheels with a cloth. Dampen a cloth with alcohol. Hold the locomotive still and wipe each wheel, rotating by hand to access all sides. Step 4: Clean rolling stock wheels. Wipe freight cars and passenger cars the same way. Step 5: Run your trains. It should accelerate smoothly without hesitation. Step 6: Establish a maintenance schedule. Clean track weekly. Clean wheels every 2-3 weeks or when you notice performance issues.
Diagnosing and Fixing Recurring Stalls After Cleaning
You cleaned your tracks thoroughly. Your trains still stall. The problem isn’t always the track. Here’s a systematic troubleshooting sequence that isolates the real cause.
Step 1: Verify Your Track Cleaning Was Complete
Before moving to other diagnostics, confirm the track itself is truly clean.
Check both rail surfaces. Most hobbyists clean the top of the rails but miss the sides and bottom. Use a cloth to wipe the sides and underside of each rail, especially where the wheel flanges make contact.
Inspect rail joiners and gaps. Stalls often occur at the same spot because a rail joiner is loose, corroded, or creating a gap. Run your finger along each joiner. It should feel flush and smooth. If you feel a step or gap, the joiner needs cleaning or replacement.
Look for hidden contamination. Dust can settle in the space between the rail and the roadbed, especially on layouts with scenery or structures nearby. Use a small brush or compressed air to clear debris from around the rails.
Step 2: Inspect and Clean Locomotive Wheels
Dirty wheels are the second most common cause of recurring stalls. Wheels can redeposit grime onto clean track within minutes of operation.
Examine wheel color and texture. Wheels should be shiny and metallic. If dull, gray, or grimy, they need cleaning.
Clean wheels thoroughly. Place the locomotive on a clean section of track (or on a test stand if you have one). Dampen a cloth with denatured alcohol.
Clean rolling stock wheels. Freight cars and passenger cars accumulate grime too. Wipe their wheels the same way. Dirty cars can contaminate clean track as they roll, undoing your cleaning work.
Test after wheel cleaning. Run the locomotive on the cleaned track. If stalling stops or improves significantly, wheel cleanliness was the problem. Establish a wheel-cleaning schedule: clean wheels every 2-3 weeks or whenever you notice performance issues.
Step 3: Check for Power Supply and Wiring Issues
If track and wheels are clean but stalls continue, the problem is likely electrical.
Test with a multimeter (if you have one). Measure voltage at different points on your track. If voltage drops significantly at certain locations, you have a wiring or connection problem. Check all power connections, terminal blocks, and wiring for corrosion or loose connections.
Inspect track feeders. Feeders are the wires that connect your power supply to the track. They should be securely attached and free of corrosion. Loose or corroded feeders create resistance and voltage drop. Clean any corroded connections with a cloth and alcohol.
Step 4: Examine Rail Joints and Continuity
Poor electrical continuity between rail sections causes stalls at specific locations.
Identify stall locations. If stalling happens in the same spot every time, the problem is track-specific. Mark that location and inspect it carefully.
Check rail joiners for tightness. Rail joiners should be snug but not over-tightened (which can crack the rail). If a joiner is loose, the electrical connection between rail sections breaks, and trains stall.
Look for gaps between rails. Temperature changes can cause rail to expand or contract slightly, creating small gaps at joiners. If you see a visible gap, the joiner may need adjustment or replacement.
Test continuity with a multimeter (if available). Place one probe on one rail section and another probe on the adjacent section. You should read near-zero resistance.
Step 5: Inspect Locomotive Pickups and Wheels for Damage
If track, wheels, and power are all clean and sound, the problem may be with the locomotive itself.
Check pickup shoes or wipers. Many locomotives have small metal shoes or wipers that press against the rails to pick up power. These can become bent, corroded, or misaligned. Look underneath your locomotive.
Inspect wheels for flat spots or damage. Wheels that have been derailed or run over obstacles can develop flat spots or cracks. These prevent smooth rolling and poor electrical contact. Damaged wheels need replacement.
Check for internal decoder or motor issues. If a locomotive stalls only on clean track, it may have an internal electrical problem. Test the locomotive on a different layout if possible. If it stalls there too, the locomotive likely needs repair or replacement.
Step 6: Evaluate Your Layout Environment
Sometimes the problem is your layout’s conditions, not the equipment.
Increase cleaning frequency if stalls return quickly. If trains run smoothly for only a few hours after cleaning, increase your maintenance schedule to twice weekly. Dust-heavy environments (basements, workshops) and high-humidity areas accelerate oxidation. Consider improving ventilation or using a small dehumidifier.
Troubleshooting Flowchart
- Stalling in the same spot? → Clean that rail section thoroughly, including sides and bottom. Check the rail joiner at that location for looseness or corrosion.
- Stalling everywhere? → Clean locomotive and rolling stock wheels thoroughly. Then check power supply voltage and wiring continuity.
- Stalling after running for a while? → Increase cleaning frequency. Your environment is collecting dust or oxidation faster than expected.
- Intermittent hesitation without full stalls? → This is often early-stage oxidation. Increase cleaning frequency to twice weekly for a month and observe improvement.
- Stalling only with certain locomotives? → Clean that locomotive’s wheels and pickups thoroughly. If stalling continues, the locomotive may have internal electrical damage.
Keep a Maintenance Log
Track when you clean, what method you use, how long your trains run smoothly afterward, and any stalls or hesitation. Over time, patterns emerge. You’ll learn your layout’s specific maintenance needs and whether the problem is truly track cleanliness or something else. This log also helps you identify whether your cleaning schedule is adequate or needs adjustment.
Frequently Asked Questions
What is the best cleaner for model train tracks?
Denatured alcohol is the gold standard for cleaning model train tracks because it removes oxidation and grime without leaving residue. Apply it with a white cloth or soft brush. For lighter buildup, vinegar or even plain water works. Avoid harsh solvents that can damage plastic ties or painted details. Always test any cleaner on a hidden section first to ensure it won’t damage your specific track type or scenery.
How often should you clean model train tracks?
Clean your model train tracks every 2-4 weeks if you run your layout regularly, or whenever you notice intermittent stalling or reduced power pickup. Covered layouts need less frequent cleaning than open ones exposed to dust. Check your track surface monthly for visible oxidation or grime buildup. High-traffic sections where locomotives run constantly may need more frequent attention than sidings or storage tracks.
Can you use abrasive pads like Scotch-Brite on model train tracks?
Abrasive pads remove oxidation and buildup quickly but can permanently alter the rail surface and create microscopic damage that affects electrical contact over time. They’re best used sparingly on stubborn rust or heavy oxidation, not as routine maintenance. For regular cleaning, stick with non-abrasive cloths and soft brushes. If you do use an abrasive pad, follow up with a non-abrasive wipe to restore electrical conductivity.
Why do model trains stall on clean-looking tracks?
Stalling can occur even on visually clean track if electrical contact is poor. Locomotive wheels may have dirt or corrosion that prevents power pickup, or the track may have oxidation beneath the surface that cleaning missed. Ensure wheels are clean and free of grime. Check rail joiners for corrosion. If stalling persists after cleaning both track and wheels, inspect your wiring and power supply connections for loose or corroded contacts.