

Table of Contents
- What You’ll Need Before You Start
- Step 1: Identify Where Your Model Train Derails
- Step 2: Clean Your Track and Wheels Thoroughly
- Step 3: Check Your Model Train Wheel Gauge
- Step 4: Inspect Track Alignment and Rail Connections
- Step 5: Troubleshoot Model Train Derails on Curves
- Step 6: Fix Model Train Derailment at Turnouts
- Step 7: Address Model Train Derailment Troubleshooting Beyond the Track
- Frequently Asked Questions
Last Updated: October 18, 2026
What You’ll Need Before You Start
Before tackling model train derailments, gather: a soft brush or cloth for track and wheels, a wheel gauge, a track gauge, a magnifying glass, a straightedge for bent rails, and a small flashlight for tight spaces.
Keep a notebook and record exactly where derailments happen and what triggers them, invaluable when troubleshooting.
At BYMRR, we recommend basic cleaning supplies before expensive diagnostic tools, many derailment problems vanish after a thorough cleaning.
Step 1: Identify Where Your Model Train Derails
Finding the exact spot on your track
The first rule of fixing model train derailments is knowing where they happen. Run your train and watch carefully. Does it derail on the straightaway? On curves? At turnouts?
Stop the train immediately, mark the spot with tape, and photograph it to pinpoint the problem area.
Check if the derailment happens consistently at the same location or randomly. Consistent derailments point to track problems. Random derailments suggest issues with the locomotive or cars themselves.
Recording the conditions when it happens
Record speed, weather (humidity affects metal expansion), and which cars derail first. If the locomotive stays on track but trailing cars jump the rails, that’s a different problem than the locomotive derailing.
Test with different locomotives. If one engine derails but another doesn’t, the issue likely involves that locomotive’s wheel gauge or weight distribution.
Run the train multiple times. One derailment might be a fluke; three in the same spot confirm a real problem.
Step 2: Clean Your Track and Wheels Thoroughly
Removing dust, grime, and debris
Dirty track causes more derailments than any other single factor.
Sweep the rails with a soft brush along their direction, not across. Focus on the inside edges where wheels ride, since debris accumulates there.
For stubborn grime, use a slightly damp cloth. Let it dry completely before running trains. Moisture can cause electrical shorts.
Clean locomotive and rolling stock wheels too, dirty wheels pick up debris, slip, and cause derailments.
Testing after cleaning
Run your train after cleaning. Many hobbyists find that cleaning alone solves half their derailment problems.
If derailments continue, move to the next step, you’ve eliminated one common cause.
Step 3: Check Your Model Train Wheel Gauge
Why wheel gauge causes derailments
Wheel gauge is the distance between the inside faces of a wheelset’s flanges, not the outside faces or tread centers. Too narrow, and the wheelset drops between the rails at a joint, frog, or guard rail. Too wide, and the flange climbs the rail head on curves and at switch points.
Back-to-back spacing, the distance between the backs of the two flanges, matters just as much. It rides against the guard rails at turnouts and crossings.
Measuring wheel gauge correctly
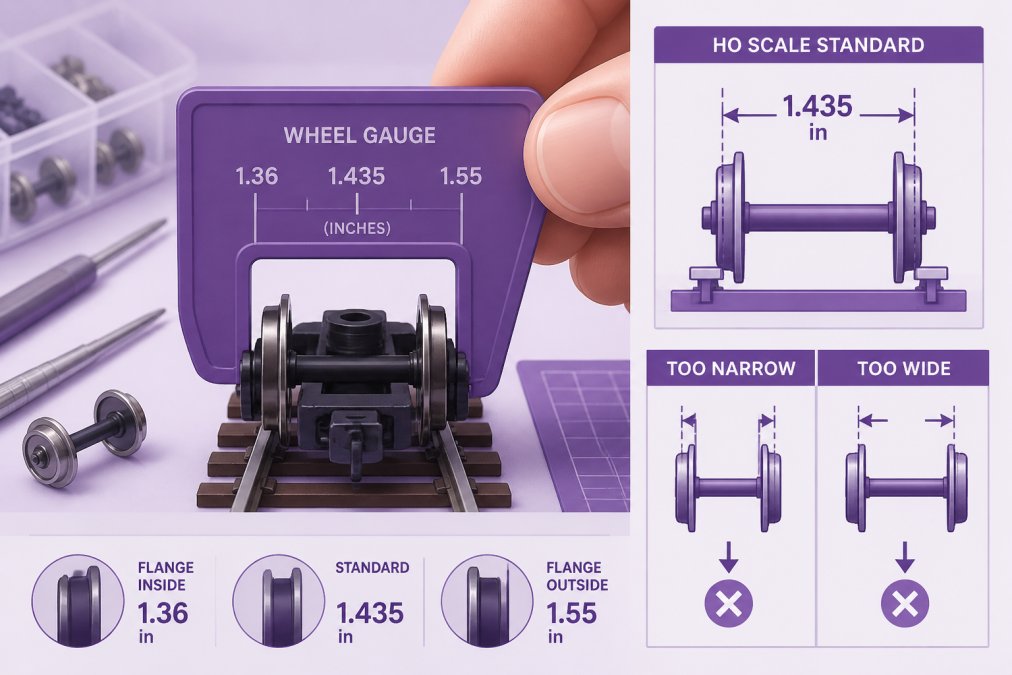
Use a dedicated wheel gauge for your scale rather than calipers alone, it checks wheel gauge, back-to-back spacing, and flange depth in one pass:
- Set the wheelset on a clean, flat surface so both wheels rest evenly.
- Seat the gauge against the wheel backs and check that the flanges drop into the gauge slots without force.
- Flip the gauge to check back-to-back spacing at the flange backs.
- Check flange depth in the notch, a flange that is too deep bottoms out on the rail head and lifts the tread clear of the rail.
- Repeat on every axle of the suspect car or locomotive, not just one.
Measure against National Model Railroad Association (NMRA) standards for your scale, not a manufacturer’s nominal figure. The NMRA publishes recommended practices (RP-2 for wheel contour, RP-3 for track, and standards sheets) defining wheel gauge, back-to-back, and flange dimensions per scale.
Measure a wheelset you know runs reliably first. It gives you a known-good reference and confirms your gauge technique before you condemn a car.
Adjusting or replacing wheels that are out of gauge
If a wheelset is out of gauge, you have three options, safest first:
- Replace the wheelset. This is the default fix for most modelers. Insulated replacement wheelsets are inexpensive, come pre-set to spec, and carry no risk of damaging the axle. Match the wheelset to your scale, axle length, and wheel profile.
- Adjust the wheelset on the axle. Some metal wheelsets can be pressed slightly in or out on the axle with a wheel press or a careful tap, then re-checked with the gauge. This works, but it is easy to overdo, move in tiny increments and re-measure after every change.
- Replace the entire truck. If the sideframes are warped or the axle holes are worn oval, adjusting wheels will not hold. A new truck assembly is the durable fix.
Avoid bending axles to change gauge, a bent axle changes the rolling circle, causes a wobble, and usually creates a new derailment elsewhere.
Scale-specific notes
Wheel gauge and back-to-back dimensions differ by scale, so never carry a number from one scale to another. HO and N are most common, but O, S, and narrow-gauge variants each have their own NMRA standards. The rule is the same: measure against the published standard for that scale, check every axle, and replace rather than force. If you model in more than one scale, keep a separate gauge for each.
Confirming the fix
After replacing or adjusting wheels, run the car alone through the derailment spot at low speed several times, then coupled to one other car. If it tracks cleanly through the problem spot and at least one curve and one turnout, the gauge issue is resolved. If it still derails, the cause is probably track or turnout geometry, move to Step 4.
Step 4: Inspect Track Alignment and Rail Connections
Checking for gaps at track joints
Track joints connect two rail sections, and gaps there create obstacles that derail trains. Use a straightedge to check alignment across each joint.
Place the straightedge across the rail tops on both sides of a joint; it should sit flush. Any gap means misalignment.
Gaps also interrupt the continuous electrical contact trains need through the rails.
Realigning bent or twisted rails
Bent or twisted rails throw wheels off track immediately. Inspect visually first, looking for rails that don’t sit flat or twist upward.
Run a straightedge along each rail section and sight down it like a rifle barrel. Any deviation means bending.
Gently tap bent rails back into alignment with a rubber mallet, striking from underneath if possible.
For severely bent rails, replacement is safer than repair. Damaged rails stay damaged even after straightening and cause recurring problems.
Step 5: Troubleshoot Model Train Derails on Curves
Understanding turn radius and speed
Curves present unique challenges for model train derailment prevention. Trains need adequate turn radius, and tight curves demand slower speeds.
Check your curve radius against your locomotive’s wheelbase. Longer locomotives need gentler curves. A long articulated engine can’t navigate the same curve as a short switcher.
Speed matters enormously on curves. Slow your train significantly when entering curves. Many derailments happen because operators run curves too fast.
Banking curves and adjusting locomotive balance
Banked curves help trains stay on track: the outer rail sits slightly higher than the inner rail, reducing derailment risk.
Check if your curves are banked with a level.
Locomotive balance also affects curve performance. A locomotive that leans to one side will derail on curves.
Add weight to the low side if needed, small lead weights glued to the frame can rebalance a tilting locomotive.
Step 6: Fix Model Train Derailment at Turnouts
Inspecting point blades and guard rails
Turnouts are notorious derailment spots. The moving point blades and guard rails must align perfectly. Any gap or misalignment throws wheels off.
Inspect point blades visually first: they should move smoothly and completely, touching the stock rails with no gap when fully switched.
Guard rails prevent wheels from climbing the outer rail at the frog. Check they sit at the correct distance from the stock rails, too far and wheels climb, too close and they bind.
Adjusting switch points safely
Adjust point blades carefully: loosen the mounting hardware slightly, move the blade gently into perfect alignment with the stock rail, and tighten while holding it in place.
Test the switch by hand first. The blades should move smoothly without binding. Then test with a locomotive at slow speed.
Many turnout problems come from worn or damaged blades. Replacement blades are inexpensive and solve persistent turnout derailments.
Step 7: Address Model Train Derailment Troubleshooting Beyond the Track
Checking coupler height and centering
Coupler height determines whether cars connect properly and stay on track.
Check coupler height with a coupler gauge. Most scales have standard coupler heights. Measure several cars. Any variation indicates a problem.
Coupler centering is equally important: a coupler offset to one side pulls the car sideways on curves, causing derailments.
Adjust couplers by bending the coupler draft gear slightly. Make small adjustments. Test frequently. Coupler work requires patience.
Testing weight distribution and truck movement
Check locomotive weight against manufacturer specifications and add weight if underweight, lead shot or fishing weights glued inside the frame.
Truck movement refers to how freely the bogies swivel. Trucks should pivot smoothly without binding. Stiff trucks cause derailments on curves.
Test truck movement by hand. The truck should swing freely. If it binds, clean or lubricate the pivot point.
Distinguishing electrical from mechanical problems
Not all derailments are mechanical. Electrical problems can trigger derailments too.
Check electrical continuity through the rails with a multimeter.
Dirty track causes electrical problems. Clean the rails thoroughly as described in Step 2.
If you’ve cleaned everything and tested the track, the problem is likely mechanical.
| Derailment Cause | Quick Check | Fix |
|---|---|---|
| Dirty track | Brush rails and wheels | Clean with soft brush |
| Wheel gauge out | Measure wheels | Replace or adjust wheels |
| Track misaligned | Use straightedge | Realign or replace rails |
| Bent rails | Sight down rails | Tap straight or replace |
| Curve too tight | Check radius | Slow speed or rebuild curve |
| Turnout worn | Inspect point blades | Adjust or replace blades |
| Coupler height wrong | Measure with gauge | Adjust coupler position |
| Truck binding | Move by hand | Clean or lubricate pivot |
Model train derailments frustrate every hobbyist eventually. But most derailments have straightforward causes and simple fixes.
When derailments persist after troubleshooting, consider your equipment.
Frequently Asked Questions
Why does my model train keep derailing?
Model train derailments usually result from dirty track, misaligned rails, wheels out of gauge, or problems at turnouts. Start by cleaning your track and wheels thoroughly, then check wheel gauge against your track gauge. If derailments happen on curves, the turn radius may be too tight for your locomotive. If they occur at turnouts, inspect the point blades and guard rails for misalignment. Test each fix before moving to the next potential cause.
Can dirty model train tracks cause derailments?
Yes. Dust, grime, and debris on rails reduce wheel contact and traction, causing wheels to slip sideways and derail. Clean your entire track layout with a soft brush or track cleaning tool, then wipe rails with a lint-free cloth. For stubborn buildup, use a specialized model train track cleaner. After cleaning, run your locomotive slowly to verify the derailment is resolved before resuming normal speeds.
How do I check whether model train wheels are out of gauge?
Use an NMRA gauge tool or a precise caliper to measure the distance between the inner flanges of both wheels on a wheelset. Compare this measurement to your track gauge specification. Most HO-scale trains use a standard gauge, but variations can occur from wear or manufacturing. If wheels measure outside the acceptable range, carefully adjust the wheel axle position or replace the wheelset. Always verify the measurement matches your specific scale and track type.
Why does my model train derail at turnouts?
Turnout derailments usually stem from misaligned point blades, worn guard rails, or wheels that don’t track smoothly through the switch. Inspect the point blades to ensure they move fully into position and make complete contact with the rails. Check that guard rails are parallel and at the correct height. Clean the turnout thoroughly, then run your locomotive through slowly in both directions. If derailment persists, the turnout may need adjustment or replacement.