

Table of Contents
- Define Your Layout Goals and Preferences
- Measure and Assess Your Available Space
- Choose a Scale and Track Configuration
- Select or Design Your Track Plan
- Use Model Railroad Layout Design Software
- Plan for Realistic Operations and Accessibility
- Validate Your Plan Before Building
- Frequently Asked Questions
Last Updated: October 14, 2026
Define Your Layout Goals and Preferences
When you plan model railroad layout design, start with knowing what you want to build.
What will your layout do?
Do you collect locomotives from a certain era, and do you want freight, passenger, or both?
Beginners need gentle curves and fewer switching areas; experienced builders can handle tight spaces and complex operations.
Write down three things:
- What era or region inspires you (modern freight, 1950s passenger service, shortline operations)
- How many trains you want running at once
- Whether you prioritize realistic operations or visual scenery
Knowing your goals before you touch a single piece of track saves months of frustration.
Measure and Assess Your Available Space
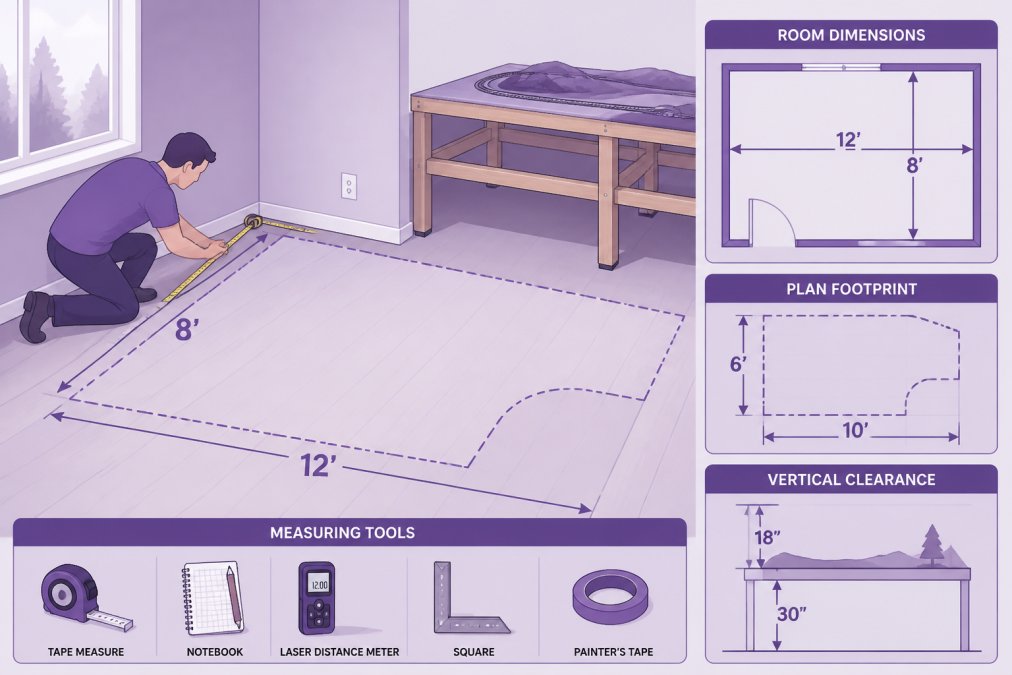
Your available space is the hard limit for everything else, so measure accurately and twice. Fill in this worksheet before buying track.
The Planning Worksheet
Copy this table into a notebook or spreadsheet and fill in every row. The right-hand column shows a common working range; adjust to your own body and room.
| Measurement | Your number | Typical working range |
|---|---|---|
| Room length (ft) | , | |
| Room width (ft) | , | |
| Usable length after obstacles (ft) | , | |
| Usable width after obstacles (ft) | , | |
| Main aisle width (in) | 30-36 in comfortable; 24 in absolute minimum | |
| Secondary/emergency aisle (in) | 18-24 in | |
| Maximum comfortable reach (in) | 24-30 in standing; 18-24 in seated | |
| Benchwork height (in) | 36-42 in standing; 26-30 in seated | |
| Minimum curve radius (in) | See scale table below | |
| Ceiling clearance above highest scenery (in) | 12 in minimum working room | |
| Door swing clearance (in) | Full door width plus 6 in |
Worked Example
Suppose you have a 12 ft × 14 ft spare room, with a door swinging 32 in into one corner and a furnace closet eating a 3 ft × 3 ft block from another.
- Usable length: 14 ft − 3 ft (closet) = 11 ft
- Usable width: 12 ft − 3 ft (closet) = 9 ft, but the door swing removes another 32 in from the entry corner, so treat the first 3 ft of that wall as unusable for benchwork.
- An island layout with a 30 in main aisle subtracts 2 × 30 in = 60 in (5 ft) from each dimension, leaving a benchwork footprint of roughly 6 ft × 4 ft, enough for a small HO loop with one siding, or a comfortable N scale layout with a passing siding and a small yard.
Run this math for your own room before looking at a track plan. A plan that looks great on paper will not fit if the benchwork footprint exceeds your calculated number.
Reach, Aisles, and Ergonomics
Reach is the distance from your shoulder to the farthest point you can touch comfortably. Most adults reach 24-30 in standing.
Aisle width is a trade-off. A 36 in aisle lets two people pass comfortably; 30 in suits one operator; 24 in works but feels tight; under 24 in becomes a safety problem.
Benchwork height matters more than beginners expect. Standing operation is comfortable with the railhead at 40-48 in (frames at 36-42 in).
Accessibility and Safety
Plan for the operator you will be in ten years, not just today. A few rules prevent most problems:
- Keep at least one continuous path at least 36 in wide from the room door to the operator position. This is the path you will use in an emergency and the path a guest or family member will use to reach you.
- Do not place a duck-under or lift-out bridge on the only path into the layout room. If you must have one, make it a lift-out or hinged gate, not a crawl-under.
- Anchor benchwork to the wall or floor where tipping is possible. A person leaning on a 24 in deep cantilevered shelf can tip it.
Obstacles to Record
Walk the room with a tape measure and pencil, marking each of these on your sketch:
- Doors and their swing arcs
- Windows and their sill heights
- Heating and cooling vents, including floor registers
These do not disappear when you build: a plan that ignores a floor register puts a bridge over a heat source, and one that ignores a door swing blocks the door.
Fill in the worksheet before you look at track plans. The usable length, usable width, aisle width, reach, and benchwork height numbers you write down become the constraints every later decision must satisfy. If a plan does not fit those numbers, it does not fit your room.
Choose a Scale and Track Configuration
HO scale is the most popular choice: large enough to see detail, small enough for modest spaces. One inch represents 87.1 inches in real life, and a typical HO locomotive is about 10 inches long (Scales & More).
N scale is smaller: one inch represents 160 inches. You fit more track in the same space, but detail work is harder.
Most beginners choose HO scale. It balances detail, cost, and space requirements.
Track configuration matters next. With DC control, a throttle sets speed but only one train runs per circuit.
DC is simpler and cheaper to start. DCC costs more upfront but offers realistic operations.
Select or Design Your Track Plan
Now match your plan model railroad layout to your space, goals, and scale.
Finding existing plans is fastest.
When you find a candidate plan, print it and trace your room dimensions on the same paper.
Modifying a plan is common.
Designing your own takes more work but gives complete control.
Remember curve radius. Tight curves limit which locomotives you can run.
Use Model Railroad Layout Design Software
Software makes planning faster and more accurate than pencil and paper, with tools from free to advanced.
Paid software adds 3D rendering, scenery design, wiring diagrams, and parts lists, helping you visualize the finished layout before buying materials.
Enter your actual room dimensions first, then place track to scale.
Export your plan as a PDF or image and print it full scale if possible, or at a reduced scale with the factor noted.
Plan for Realistic Operations and Accessibility
Realistic operations means trains actually do something: they switch cars, visit industries, and move freight rather than just looping.
Add sidings for switching. A siding is a branch where cars wait to be picked up, connecting industries like warehouses, grain elevators, or factories.
Think about ergonomics: for hours-long sessions, benchwork height should let your arms rest naturally at the throttle.
Validate Your Plan Before Building
Validation separates a plan that works from one that gets rebuilt. Do it before buying benchwork lumber or cutting track. Here are the concrete methods, in the order most builders find useful.
1. Print Full-Size Templates
Most track planning software exports a 1:1 plan across multiple sheets. Print, tape them on the floor, and lay actual track on top.
If you cannot print full size, print at a known reduction, say half size, and mark the factor on every sheet. Measure a known distance (a 36 in straight section should read 18 in) to confirm your printer did not rescale the image.
2. Build a Cardboard or Foam Mock-Up
For a small layout, cut the benchwork footprint from cardboard or rigid foam and set it in the room. Stand where you will stand, reach across, walk the aisle. An hour reveals problems no drawing shows, a door that will not open, a reach two inches too far, a height that puts the railhead above your line of sight.
For a larger layout, mock up only the tight spots: deepest reach, narrowest aisle, most complex switching area. Those are where plans fail.
3. Check Clearances With a Test Train
Before committing to benchwork, run your longest locomotive and car through the plan on the floor or a temporary test track. Check three clearances:
- Curve clearance. A long locomotive or passenger car overhangs the inside of a tight curve. If the overhang hits scenery, a tunnel portal, or an adjacent track, the plan fails. Most HO locomotives need at least 18 in radius; many need 22-24 in. N scale often works down to 9¾-11 in radius, but longer equipment still needs more. O scale typically needs 36 in or more for realistic operation.
- Vertical clearance. Measure from the top of the tallest car to the underside of any bridge, tunnel, or upper level. Leave at least 3 in in HO and 2 in in N scale for fingers and for future scenery. If you plan a double-deck layout, measure the space between decks with the tallest equipment on the lower deck.
- Side clearance. Leave at least 2 in between parallel tracks in HO and 1½ in in N scale at the closest point, and more on curves where equipment overhangs.
4. Validate With Software
If you use track planning software, use its validation tools, not just drawing tools. Run the clearance, minimum radius, and train-length checks with your actual longest locomotive and car lengths, not defaults. Export a parts list and compare it against your planned purchases, a missing turnout or short flex track section is easy to overlook on a drawing and obvious on a list.
5. Walk the Plan With an Experienced Builder
Join a local model railroad club or visit a hobby shop and show your plan to someone who has built more than one layout. They spot problems you cannot see. Common catches: an unreachable turnout, a siding too short for the cars you intend to switch, an aisle that looks wide on paper but feels narrow once benchwork and scenery are in.
6. Phase the Build and Budget
You do not have to buy everything at once, and should not. A phased plan lets you validate each stage before spending on the next.
| Phase | What you buy | What you validate |
|---|---|---|
| 1. Benchwork | Lumber, fasteners, legs, foam or plywood top | Does the footprint fit? Is the height comfortable? Is it stable? |
| 2. Track | Roadbed, flex track, turnouts, rail joiners | Does the geometry close? Do curves meet your minimum radius? |
| 3. Wiring | Bus wire, feeders, terminal blocks, command station or DC throttle | Does every block or power district work? Can you run a test train end to end? |
| 4. Scenery | Foam, plaster, ground cover, rock molds | Does scenery intrude on clearances? Can you still reach the track? |
| 5. Structures and details | Buildings, figures, vehicles, signals | Do structures block reach or sight lines? |
| 6. Rolling stock | Locomotives and cars for your operating scheme | Does your longest equipment run cleanly on every curve and turnout? |
Buy tools once at the start: tape measure, track gauge, NMRA standards gauge, soldering iron, and multimeter. They are reused across every phase.
Common Planning Mistakes to Avoid
- Curves tighter than your longest locomotive’s minimum radius
- Aisles narrower than 24 in, or a single aisle that is also the only path to the door
- Track placed more than 30 in from the aisle edge, making it unreachable
The most expensive mistake is building benchwork before validating the track plan. Benchwork is hard to move and expensive to rebuild. Validate the plan on paper, on the floor, and with a test train first.
Validation is not a formality. Print the plan full size, mock up the tight spots, run a test train through every curve and turnout, and phase your purchases so each stage proves itself before the next one begins. The time you spend validating now saves weeks of rebuilding later.
NMRA standards and recommended practices for track and wheel dimensions
Frequently Asked Questions
How do I choose the right track configuration for my model railroad layout?
Start by considering your space and operating goals. Oval or figure-eight configurations work well for beginners and fit smaller spaces. Branch lines, sidings, and yards add complexity and realism but require more room. Match your track configuration to your available space and the type of operation you want, passenger service, freight switching, or continuous running. Your scale and locomotive collection should also influence this decision.
Where can I find free model railroad track plans to adapt for my layout?
The National Model Railroad Association (NMRA) and hobby magazines publish free track plans online. Track plan databases and hobbyist forums share designs for various scales and space constraints. Many of these plans are available as PDFs or can be modified using design software. Start with plans that match your scale and room dimensions, then adapt them to fit your specific space and operational preferences.
What are the ideal model train layout dimensions for a beginner?
A starter layout typically ranges from 4 feet by 8 feet to 6 feet by 10 feet, depending on your available space. Minimum aisle width should be 24 inches for comfortable access and operation. Curve radius matters too, HO scale requires at least 18-inch radius curves for smooth operation; N scale works with tighter curves. Measure your room carefully, account for doors and furniture, and ensure you have comfortable reach to all areas of your layout.
Should I use model railroad layout design software, or can I sketch my plan by hand?
Design software speeds up the planning process and lets you test track geometry, clearances, and reach before building. Many hobbyists start with hand sketches to explore ideas, then use software to validate measurements and ensure proper curve radii and turnout spacing. Free and paid software options exist, choose based on your comfort level with technology and the complexity of your planned layout. Software helps you avoid costly mistakes and visualize the final design.
Planning a model railroad layout is the foundation for everything that comes next. Take time with these steps. Measure carefully. Choose your scale and goals. Find or design a track plan that fits your space. Test it before you build. BYMRR provides comprehensive guides and high-quality kits to help you execute your plan with confidence. Start with the right foundation, and your layout will bring years of enjoyment and realistic operation.